I've gotten a lot of questions lately about this whole bread-baking thing I've been getting into. So I thought I would share my process for those of you who think baking bread is, like, wayyyyy too much work. Because seriously, if it was really that hard, I wouldn't do it.
First of all, if you're interested in baking your own bread but really don't know where you would find the time, or are worried about all this rising and kneading business, fear not. Just go right out and buy a copy of Artisan Bread in Five Minutes a Day
Got it? Good.
Okay, so once you have this book in hand, you will discover that baking bread can actually be easy. And fast. And such a pleasure.
If you have baked yeast bread before (sorry, banana bread doesn't count -- it's awesome, but a totally different beast), or heard or read about it, you may have been somewhat intimidated by things like "proofing the yeast," and "a warm, dark place," and "punching down the dough," and "kneading until satiny." At least, those were the things that always kind of scared me when I would read bread recipes.
I remember trying to bake bread once in high school, and the result turning out something juuust a smidge softer than a brick. Then once in my twenties -- for a party! -- I attempted to make some Silver Palate recipe that involved yeast dough stuffed with some kind of sausage thing and baked in a bundt pan. (What was I thinking? Why do I always think a party is the perfect occasion to try something ridiculously complex and above my level??) The dough didn't rise properly and the whole thing was a disaster (although the filling was delicious and we all just picked it out and pretended all was well).
Anyway, after those two experiences, I was sufficiently humbled. I knew this bread-baking stuff was not for amateurs like me, clearly. But then I heard a snippet about Artisan Bread in Five Minutes a Day
Oh yes. I bought the book, and read pretty much the whole thing, all the recipes, all the explanations, so I could understand the process. And then, having assembled my ingredients and memorized the basic recipe, I tried it. And have been baking bread about twice a week ever since. Sounds a little hokey to say it has changed my life, but in some ways, it really has.
Truth be told, I am a bread snob. I will frequently refuse to have a sandwich if the only available bread is some kind of soft, processed sandwich bread. I like my sandwiches on a good, dense sourdough, or on a baguette. By their very nature, these things don't keep -- you can't just have a good, fresh baguette on hand every day, especially when you try to only go to the grocery store once a week. Also, at least 50% of the recipes in my repertoire (maybe more, actually) should be served with "good bread." So I'd either be running to the bakery three times a week, or buying the "take-and-bake" artisan loaves in the freezer section... and quite frankly, spending a small fortune on bread. Good bread is $3 or $4, even at the local grocery store, let alone the good bakery. But come on, you can't have a good homemade soup without crusty bread on the side!
So, now I have bread whenever I want it, and it is some of the best bread I have ever tasted. For the full recipe and method, I'm afraid you'll have to buy the book, but here is my basic process, just to show you how easy this can all be.
Step 1: Assemble ingredients. For a basic boule dough, you'll only need four things: flour, salt, yeast, and water. Yeah, it's that simple. Can I just tell you how much I love knowing exactly what is in my bread? I buy the yeast by the jar and keep it in the fridge -- it's much more economical that way, plus I find the little packets annoying. I use unbleached all-purpose flour, kosher salt, and tap water. For me, these are all things I have around anyway, the only thing I had to go out and buy was the yeast.
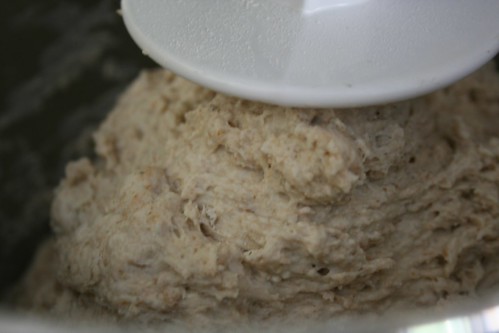
Step 2: Make the dough. I can now do this without looking at a recipe or really even thinking about it. I put the yeast and salt in the bowl of my stand mixer, pour in the warm-not-hot water, and stir it up a little. Then I dump in the flour cup by cup. Then, using the dough hook on my stand mixer, I stir it up. This whole process, measuring and stirring, takes about two minutes. You don't need to knead the dough with the mixer, just get all the flour incorporated into one big glob.
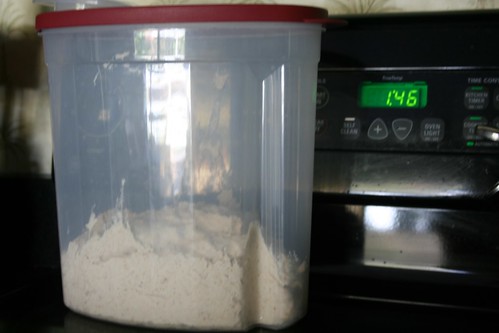
Step 3: Let the dough rise. Here's where things get a little wacky. You put the big glob of dough into a big tupperware container. The container should have room for the dough to quadruple in size. Put the lid on, but not airtight, and let it sit on the counter or wherever for about two hours or so. No covering with a damp towel, no keeping it away from drafts, no searching for a "warm, damp place," wherever that may be. If you leave it longer, no sweat, it'll wait for you. I've left it for five or six hours with no apparent ill effects.
Step 4: Stick it in the fridge. Once the dough has risen (and the first time you do this, it will freak you out -- it really does quadruple in size and it is pretty dang cool), you can either bake with it right away, or put it in the fridge and use it... anytime in the next two weeks. (Hell, I once pushed it to three weeks and it was still pretty good, a little sourdough-y kind of taste.) It's like money in the bank. Every time I use up the last of my fridge-dough, I make another batch right away... I guess I've just become accustomed to the security of knowing, "I could bake bread at any moment!"
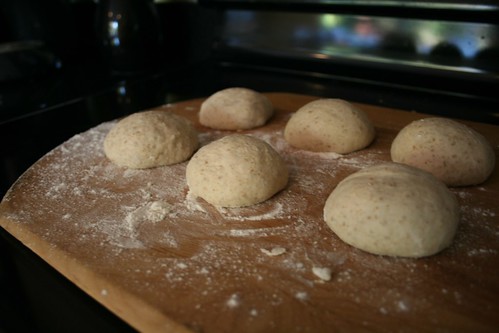
Step 5: Hmm, I think I'd like a baguette with dinner tonight.... Take dough out of fridge, and get ready for some fun. :) Dust the top of the dough with some flour to make it easier to grab a hunk of it, and take out a glob -- I use an apple-sized blog for a baguette, a bit bigger for a boule, and little plum-sized globs for rolls. Adding flour as necessary, make the glob into a ball in your hands. Now this is the only remotely tricky part of the whole operation: you need to shape the ball by pulling the dough around the sides to the bottom, then turn it 90 degrees and do it again, and keep repeating this motion until the ball has a smooth finish. I kept reading this part in the book and could not figure it out, but once you have the dough in your hands, it becomes obvious. This is really the only "kneading" you have to do, and it is actually quite lovely to have this smooth ball of dough in your hands. Anyway, if you're making a baguette you now need to roll it like you're making a play-dough snake, or if you're making a boule or roll, you're essentially done. The dough now just needs to rest a bit before going in the oven -- I put a little cornmeal or whole wheat flour on a pizza peel (one of those wooden paddles with a handle that they use in pizzerias for taking pizzas out of the oven), and set my dough on it to hang out while the oven preheats. Depending on what you're making, the dough needs to rest for 20-40 minutes usually.
Step 6: Prepare oven. First, I make sure my baking stone is relatively clean. (Note 1: You don't need a baking stone. I baked my first loaf on a regular cookie sheet with a silicone baking liner -- worked great.) (Note 2: If you do have or get a baking stone, "clean" just means you brush off the cornmeal from the last time you baked on it -- it will still be ugly and stained. Lesson learned there.) I put my baking stone on a rack that's relatively centered in the oven, and put an empty shallow baking pan on the shelf below it before preheating the oven. Then I turn it on.
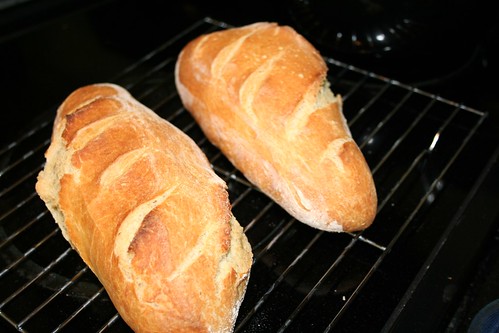
Step 7: Bake. By the time the oven's preheated, the dough is done resting and is ready to go. Usually you need to slash the top of the dough -- you can get creative with this -- right before putting it in the oven. Slide it off the pizza peel directly onto the baking stone (or if you're using a cookie sheet, you can have it rest on the cookie sheet and then just put it in the oven). Now, really quick, you pour one cup of hot water into that shallow baking pan on the lower shelf, and then quickly close the oven door. That's going to create the steam that gives you a great artisan crust. Bake for the allotted time, use the pizza peel to slide the loaf out of the oven, and cool on wire cooling racks.
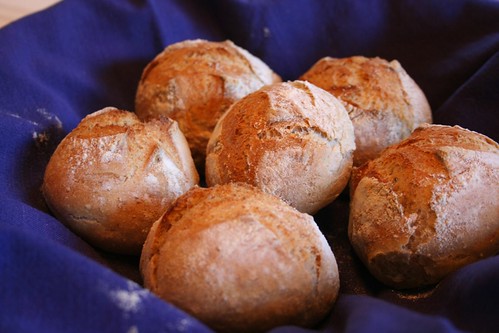
Ta-da! You have bread. No, not just bread... good bread. Bread that's as good as the crusty $4 loaves in the bakery of your supermarket. Bread that rivals the bread from the best bakery in your town. Bread that you didn't have to leave the house for. Bread that you get to smell while it bakes. Bread for which you know all of the ingredients. Good bread.
Now, this handy-dandy book I keep talking about has recipes for just about any yeast-based bread you can imagine. Sometimes you use the same recipe -- like the basic boule dough -- to make a bunch of different things, like baguettes, naan, pizza, etc. Or there are different dough recipes to make really different kinds of bread. I've made rye, whole wheat, brioche, even bagels. And once you have dough in your fridge on a regular basis, all kinds of things become possible. It's 6pm and you haven't thought about dinner yet? No problem! Grab some dough, roll out a pizza crust, slap on some toppings (surely you have some cheese in the house, maybe a tomato? some leftover veggies?), and stick it in the oven. You won't be so quick to call Domino's when you can have pizza that is ten times better at the drop of a hat.
It's such a simple thing -- to bake your own bread -- but for me it has meant so much. I just feel that much more connected to the meal I'm putting on the table, when even the bread on the side is my own creation. I feel that much more in control, knowing I can have my own baguette baking in the oven faster than I could get to the store and back. And for someone who does truly love bread, the experience of smelling the loaf baking in the oven, listening to it crackle on the counter as it cools... it all fills me with delight. A simple joy, a little miracle of chemistry, right in my own kitchen. Yum.
This is awesome!! I need to get this book. I had no idea yeast dough would keep in the fridge that long. I already make our own pizza dough so it's been something that we only do on weekends. It's great for the kids because I let them make their own mini pizzas with whatever toppings they want to slap on and they think it's great. But having fresh bread with every meal would be great.
ReplyDeleteOh my, your breads are gorgeous! Thank you so much for sharing your faulous baking with your readers, we are so thrilled that you are using the book and having so much fun with all the breads!
ReplyDeletehappy Baking! Zoë François
Great explanation of how easy it is! I will put that book on my wish list with Amazon...loved the narration and pics!
ReplyDeleteOk, I am sold- gonna get myself a copy today! I have made bread before, but this sounds so much easier and the bread looks amazing. I am also a bread snob. Can't wait to see what recipes they have! The one baking goal I have that is yet to be accomplished....Croissants from scratch. That sounds really scary- but one day I will do this.
ReplyDeleteHmmm...you've got me thinking; maybe even I could do this.
ReplyDeleteok I am embarrassed to admit that until I read this blog I had no idea what to use the hook thingy that came with my kitchenaide mixer I got 5 years ago...that's right, 5 years wondering "hmmm wonder when I'd use this"
ReplyDeleteLook at you with your fancy pizza peel! I want one.
ReplyDeleteIt really is JUST THAT EASY. It's crazy, really. So luxurious, so little effort.
Fantastic write-up, too. WAY better than mine!